2020년 1월 24일 금요일

[Scrap] Zero to Hero: Guide to Object Detection using Deep Learning: Faster R-CNN,YOLO,SSD

Zero to Hero: Guide to Object Detection using Deep Learning: Faster R-CNN,YOLO,SSD

In this post, I shall explain object detection and various algorithms like Faster R-CNN, YOLO, SSD. We shall start from beginners’ level and go till the state-of-the-art in object detection, understanding the intuition, approach and salient features of each method.
What is Image Classification?:
Image classification takes an image and predicts the object in an image. For example, when we built a cat-dog classifier, we took images of cat or dog and predicted their class:
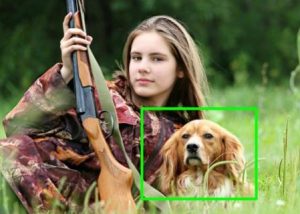
What do you do if both cat and dog are present in the image:
What would our model predict? To solve this problem we can train a multi-label classifier which will predict both the classes(dog as well as cat). However, we still won’t know the location of cat or dog. The problem of identifying the location of an object(given the class) in an image is called localization. However, if the object class is not known, we have to not only determine the location but also predict the class of each object.
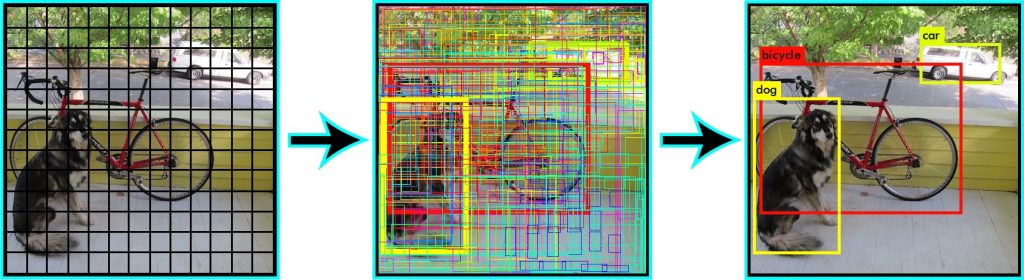
Predicting the location of the object along with the class is called object Detection. In place of predicting the class of object from an image, we now have to predict the class as well as a rectangle(called bounding box) containing that object. It takes 4 variables to uniquely identify a rectangle. So, for each instance of the object in the image, we shall predict following variables:
class_name, 
bounding_box_top_left_x_coordinate,
bounding_box_top_left_y_coordinate,
bounding_box_width,
bounding_box_height
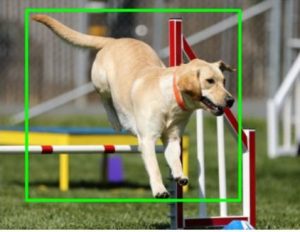
Just like multi-label image classification problems, we can have multi-class object detection problem where we detect multiple kinds of objects in a single image:
In the following section, I will cover all the popular methodologies to train object detectors. Historically, there have been many approaches to object detection starting from Haar Cascades proposed by Viola and Jones in 2001. However, we shall be focussing on state-of-the-art methods all of which use neural networks and Deep Learning.
Object Detection is modeled as a classification problem where we take windows of fixed sizes from input image at all the possible locations feed these patches to an image classifier.
Demo of Sliding WIndow detector      
Each window is fed to the classifier which predicts the class of the object in the window( or background if none is present). Hence, we know both the class and location of the objects in the image. Sounds simple! Well, there are a few more problems. How do you know the size of the window so that it always contains the image? Look at examples:
Small sized object
Big sized object. What size do you choose for your sliding window detector?

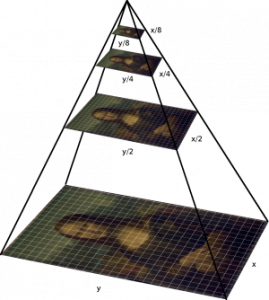
As you can see that the object can be of varying sizes. To solve this problem an image pyramid is created by scaling the image.Idea is that we resize the image at multiple scales and we count on the fact that our chosen window size will completely contain the object in one of these resized images. Most commonly, the image is downsampled(size is reduced) until certain condition typically a minimum size is reached. On each of these images, a fixed size window detector is run. It’s common to have as many as 64 levels on such pyramids. Now, all these windows are fed to a classifier to detect the object of interest. This will help us solve the problem of size and location.
                                          
There is one more problem, aspect ratio. A lot of objects can be present in various shapes like a sitting person will have a different aspect ratio than standing person or sleeping person. We shall cover this a little later in this post. There are various methods for object detection like RCNN, Faster-RCNN, SSD etc. Why do we have so many methods and what are the salient features of each of these? Let’s have a look:

1. Object Detection using Hog Features:

In a groundbreaking paper in the history of computer vision, Navneet Dalal and Bill Triggs introduced Histogram of Oriented Gradients(HOG) features in 2005. Hog features are computationally inexpensive and are good for many real-world problems. On each window obtained from running the sliding window on the pyramid, we calculate Hog Features which are fed to an SVM(Support vector machine) to create classifiers. We were able to run this in real time on videos for pedestrian detection, face detection, and so many other object detection use-cases.

2. Region-based Convolutional Neural Networks(R-CNN):

Since we had modeled object detection into a classification problem, success depends on the accuracy of classification. After the rise of deep learning, the obvious idea was to replace HOG based classifiers with a more accurate convolutional neural network based classifier. However, there was one problem. CNNs were too slow and computationally very expensive. It was impossible to run CNNs on so many patches generated by sliding window detector. R-CNN solves this problem by using an object proposal algorithm called Selective Search which reduces the number of bounding boxes that are fed to the classifier to close to 2000 region proposals. Selective search uses local cues like texture, intensity, color and/or a measure of insideness etc to generate all the possible locations of the object. Now, we can feed these boxes to our CNN based classifier. Remember, fully connected part of CNN takes a fixed sized input so, we resize(without preserving aspect ratio) all the generated boxes to a fixed size (224×224 for VGG) and feed to the CNN part. Hence, there are 3 important parts of R-CNN:
  1. Run Selective Search to generate probable objects.
  2. Feed these patches to CNN, followed by SVM to predict the class of each patch.
  3. Optimize patches by training bounding box regression separately.

3. Spatial Pyramid Pooling(SPP-net):

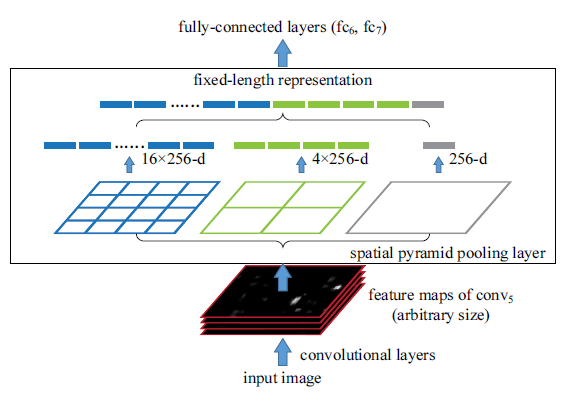
Still, RCNN was very slow. Because running CNN on 2000 region proposals generated by Selective search takes a lot of time. SPP-Net tried to fix this. With SPP-net, we calculate the CNN representation for entire image only once and can use that to calculate the CNN representation for each patch generated by Selective Search. This can be done by performing a pooling type of operation on JUST that section of the feature maps of last conv layer that corresponds to the region. The rectangular section of conv layer corresponding to a region can be calculated by projecting the region on conv layer by taking into account the downsampling happening in the intermediate layers(simply dividing the coordinates by 16 in case of VGG).
There was one more challenge: we need to generate the fixed size of input for the fully connected layers of the CNN so, SPP introduces one more trick. It uses spatial pooling after the last convolutional layer as opposed to traditionally used max-pooling. SPP layer divides a region of any arbitrary size into a constant number of bins and max pool is performed on each of the bins. Since the number of bins remains the same, a constant size vector is produced as demonstrated in the figure below.
However, there was one big drawback with SPP net, it was not trivial to perform back-propagation through spatial pooling layer. Hence, the network only fine-tuned the fully connected part of the network. SPP-Net paved the way for more popular Fast RCNN which we will see next.  

4. Fast R-CNN:

              Fast RCNN uses the ideas from SPP-net and RCNN and fixes the key problem in SPP-net i.e. they made it possible to train end-to-end. To propagate the gradients through spatial pooling,  It uses a simple back-propagation calculation which is very similar to max-pooling gradient calculation with the exception that pooling regions overlap and therefore a cell can have gradients pumping in from multiple regions.
              One more thing that Fast RCNN did that they added the bounding box regression to the neural network training itself. So, now the network had two heads, classification head, and bounding box regression head. This multitask objective is a salient feature of Fast-rcnn as it no longer requires training of the network independently for classification and localization. These two changes reduce the overall training time and increase the accuracy in comparison to SPP net because of the end to end learning of CNN.

5. Faster R-CNN:

So, what did Faster RCNN improve? Well, it’s faster. And How does it achieve that? Slowest part in Fast RCNN was Selective Search or Edge boxes. Faster RCNN replaces selective search with a very small convolutional network called Region Proposal Network to generate regions of Interests.
To handle the variations in aspect ratio and scale of objects, Faster R-CNN introduces the idea of anchor boxes. At each location, the original paper uses 3 kinds of anchor boxes for scale 128x 128, 256×256 and 512×512. Similarly, for aspect ratio, it uses three aspect ratios 1:1, 2:1 and 1:2. So, In total at each location, we have 9 boxes on which RPN predicts the probability of it being background or foreground. We apply bounding box regression to improve the anchor boxes at each location. So, RPN gives out bounding boxes of various sizes with the corresponding probabilities of each class. The varying sizes of bounding boxes can be passed further by apply Spatial Pooling just like Fast-RCNN. The remaining network is similar to Fast-RCNN. Faster-RCNN is 10 times faster than Fast-RCNN with similar accuracy of datasets like VOC-2007. That’s why Faster-RCNN has been one of the most accurate object detection algorithms. Here is a quick comparison between various versions of RCNN.

Regression-based object detectors:

So far, all the methods discussed handled detection as a classification problem by building a pipeline where first object proposals are generated and then these proposals are send to classification/regression heads. However, there are a few methods that pose detection as a regression problem. Two of the most popular ones are YOLO and SSD. These detectors are also called single shot detectors. Let’s have a look at them:

6. YOLO(You only Look Once):

For YOLO, detection is a simple regression problem which takes an input image and learns the class probabilities and bounding box coordinates. Sounds simple?
          YOLO divides each image into a grid of S x S and each grid predicts N bounding boxes and confidence. The confidence reflects the accuracy of the bounding box and whether the bounding box actually contains an object(regardless of class). YOLO also predicts the classification score for each box for every class in training. You can combine both the classes to calculate the probability of each class being present in a predicted box.
So, total SxSxN boxes are predicted. However, most of these boxes have low confidence scores and if we set a threshold say 30% confidence, we can remove most of them as shown in the example below.
Notice that at runtime, we have run our image on CNN only once. Hence, YOLO is super fast and can be run real time. Another key difference is that YOLO sees the complete image at once as opposed to looking at only a generated region proposals in the previous methods. So, this contextual information helps in avoiding false positives. However, one limitation for YOLO is that it only predicts 1 type of class in one grid hence, it struggles with very small objects.

7. Single Shot Detector(SSD):

Single Shot Detector achieves a good balance between speed and accuracy. SSD runs a convolutional network on input image only once and calculates a feature map. Now, we run a small 3×3 sized convolutional kernel on this feature map to predict the bounding boxes and classification probability. SSD also uses anchor boxes at various aspect ratio similar to Faster-RCNN and learns the off-set rather than learning the box. In order to handle the scale, SSD predicts bounding boxes after multiple convolutional layers. Since each convolutional layer operates at a different scale, it is able to detect objects of various scales.
That’s a lot of algorithms. Which one should you use? Currently, Faster-RCNN is the choice if you are fanatic about the accuracy numbers. However, if you are strapped for computation(probably running it on Nvidia Jetsons), SSD is a better recommendation. Finally, if accuracy is not too much of a concern but you want to go super fast, YOLO will be the way to go. First of all a visual understanding of speed vs accuracy trade-off:
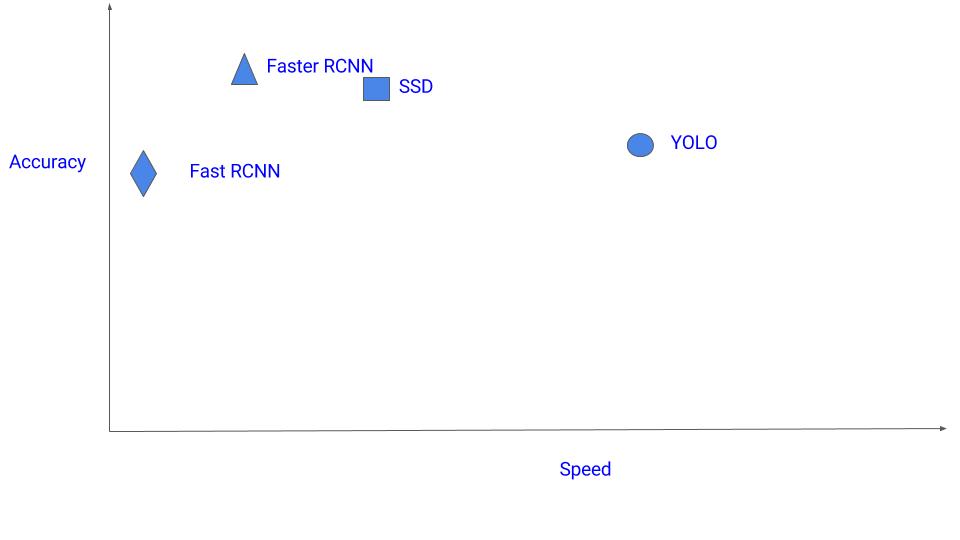
SSD seems to be a good choice as we are able to run it on a video and the accuracy trade-off is very little. However, it may not be that simple, look at this chart that compares the performance of SSD, YOLO, and Faster-RCNN on various sized objects. At large sizes, SSD seems to perform similarly to Faster-RCNN. However, look at the accuracy numbers when the object size is small, the gap widens.
YOLO vs SSD vs Faster-RCNN for various sizes
Choice of a right object detection method is crucial and depends on the problem you are trying to solve and the set-up. Object Detection is the backbone of many practical applications of computer vision such as autonomous cars, security and surveillance, and many industrial applications. Hopefully, this post gave you an intuition and understanding behind each of the popular algorithms for object detection.

2020년 1월 8일 수요일

편광필름의 종류

편광필름의 종류


1. 요오드계 편광필름
고투과 고편광 특성을 갖는 고선명 LCD용 편광필름으로서 투명한 PVA 필름에 가시광 영역의 빛 흡수 능력을 부여하기 위해 높은 이색성을 갖는 요오드를 사용한 필름. 현재까지 LCD에 사용되는 편광필름의 대부분은 요오드계 편광필름입니다.
고온 및 고습도 조건에서도 광학특성의 변화가 적은 고내구성 편광필름으로서 내구성이 높은 장점 때문에 높은 내구성을 요구하는 LCD에 사용되고 있습니다. 또한 염료계 편광필름의 경우 색깔의 조절이 비교적 용이하기 때문에 다양한 색의 편광필름을 제조할 수 있으며 이는 선글라스 등의 분야에도 사용되고 있습니다.
2. 위상차 편광필름
고속응답형 액정 디스플레이(STN-LCD : Super Twisted Nematic LCD)용에 주로 사용되며 편광필름에 어떤 특성을 갖는 위상차 필름을 어떤 각도로 적용하느냐에 따라 매우 다양한 제품이 생산됩니다. 백라이트(backlight)에서 나오는 빛이 패널의 아래쪽 편광 필름에서 선형 편광되어 광학적 이방성을 갖는 액정을 통과하는 경우, 액정 cell을 수직으로 통과할 때와 비스듬히 통과할 때 그 위상지연(retardation)값이 서로 달라 위상차가 발생합니다. 위상차 필름은 이러한 액정 자체의 복굴절로 인한 위상차를 보상해 주는 역할을 하여 R, G, B 에 따른 다른 빛의 투과량을 비슷하게 조절하여 시야각 보상 및 색상 개선 등의 기능을 보유한 편광필름입니다. PC (Ploycarbonate)재질의 위상차 필름이 주로 STN에 사용되고 있으며, 최근에는 노보넨(Norbornene) 계열의 COP(Cycle-olefin Polymer) 고분자들이 사용된 위상차 편광필름이 TFT-LCD VA mode에 적용되고 있습니다. 위상차 편광필름은 사용되는 액정 모드에 따라 매우 많은 종류가 있습니다.
3. 액정보상 편광필름
STN LCD에서 위상보상을 위하여 PC 재질의 위상차 필름을 많이 사용하지만, 이는 특정한 파장에서만 보상이 가능하므로 완벽한 B/W 구현이 어렵습니다. 이를 개선하기 위하여 STN cell의 액정과 반대로 꼬아놓은 액정코팅 보상필름을 사용하여 STN cell을 통과하여 발생한 위상차를 전 파장에서 보상시켜 완벽한 B/W 구현이 가능한 편광필름입니다. 이러한 액정보상 편광필름은 투과형/반투과형 Color STN LCD와 B/W STN에 적용되고 있습니다.
4. 반투과 편광필름
투과 특성과 반사 특성을 동시에 갖는 반투가 반사형 편광필름입니다. 이동기기의 디스플레이에서 가장 중요한 요소중의 하나는 소비전력으로, 소비전력이 높으면 제품의 사용시간이 짧아지는 문제점이 있기 때문에 소비전력이 높은 기존의 투과형 제품 대신에 외부의 빛을 활용하는 반사기능을 첨가하여 생산되는 반투과형 LCD에 하판용 재료로 사용되는 기능성 필름입니다. 이러한 반투과 편광필름은 사용하는 재료와 특성값에 따라 다양한 종류가 있습니다. BW-STN LCD에는 점착제에 안료를 첨가하여 투과율을 조절한 제품(ST type)이 적용되며 CSTN LCD와 TFT LCD에는 각각의 액정 모드에 적합한 위상차 편광필름이 사용되고 있습니다.
5. 고반사 반투과 편광필름
최근 STN-NCdl에서 소비전력을 줄이고 디스플레이의 외관을 좀 더 깨끗하게 보이도록 하기 위해서 기존 안료를 사용한 반투과 편광필름 대신 금속증착 필름을 사용하여 반사율을 높이고 확산 점착제를 사용해 외관을 깨끗하게 개선한 고반사 반투과 편광필름(SG type) 사용이 확대되고 있습니다.
6. 반사형 편광필름
일반 투과형(요오드계) 편광필름에 금속증착반사 필름을 합지해서 만드는 제품으로 반사형 LCD에 사용합니다.
7. 표면반사 방지 편광필름
표면반사방지는 AG(Anti-glare) 표면처리 가공과 AR(Anti-reflect) 표면처리 가공의 2가지 방식이 있습니다. AG가공은 필름의 표면에 불규칙한 면을 형성 함으로써 외부빛을 표면에서 난반사시켜 반사방지효과를 나타내며 AR가공은 굴절률(Reflective Index)이 다른 여러층의 박막을 증착법이나 코팅법에 의해서 필름의 표면에 형성함으로써 반사방지 효과를 나타냅니다. 일반적으로 반사방지 가공을 하지 않는 편광필름의 반사율은 약 4%이며 AG필름은 반사율이 약 2%, AR 필름은 반사율 0.5% 미만의 값을 갖습니다.


출처: https://blog.naver.com/moys79/110024192997

2018년 12월 13일 목요일

NanoPi root file system 만들기

먼저, 제일 어려운 용어 부터 정리하고 넘어가 보자.

Root file system이란?

간단히 정의하자면 linux의 operating system이라고 설명할 수 있을 것 같다.
옛날 옛적의 MS-DOS (Disk Operating System)의 기능에서 유추하면 대략의 윤곽을 잡을 수 있다.
지금과 같은 화려한 Windows/MAC OS 같은 GUI 기반의 OS가 없던 시절에 쓰던 DOS에는 PC를 운영하기 위한 기능이 비교적 간단했다. 디스크를 읽거나 쓰고, 디스크의 내용을 조회하거나 시스템에 연결된 주변 장치를 조회하는 등의 작업을 지원하거나, operating system에서 지원하지 않는 기능들을 별도의 프로그램으로 작성하여 실행하는 것이 전부였다고 보면 될 것 같다. (물론 그 이면에 더 복잡한 시스템이 있겠지만 일반적인 사용자 관점에서 그렇다는 얘기다. - 누군가가 'MS-DOS가 뭐야?' 라고 묻는다면 귀찮은 대답을 피하고 싶어하는 엔지니어라면 의례 'command.com이야' 라고 얘기할걸? :))
dir, copy, del, move, type, echo 등과 run.exe와 같은 간단한 명령을 텍스트 기반의 입력 장치를 통해 수행하는 것이다. dir, copy 등과 같은 기본적인 디스크 작업 명령은 별도의 실행 파일을 가지고 있지 않고 command.com라는 텍스트 기반 프로그램의 하위 기능으로 구현이 되었는데, 아직 익숙하지는 않겠지만 linux의 busybox와 유사한 구성이라고 할 수 있겠다.
아무튼, 컴퓨터를 '사람'이 사용하기 위해서는 의사소통의 다리 역할을 하는 프로그램으로 구성된 operating system이 필요한데, 이것이 root file system인 것이다.

그렇다면 컴퓨터(embedded 기기)사용자는 root file system을 이해하고 사용해야 하는가?

결론부터 성급하게 말해보자면, '아니다'. 현대의 컴퓨터 시스템에서는 MS-DOS 시절처럼 컴퓨터에서 하는 작업이 단순하지 않다. 컴퓨터의 기능이 향상되면서, 수많은 복잡한 일들을 처리할 수 있게 operating system이 진화하였고, 반대로 사용자는 점점 복잡하거나 익숙하지 않은 것을 피할 수 있게 되었다. 더 이상 대부분의 사용자는 operating system을 통해 기기와 의사소통을 주고받지 않는다. 수많은 능력 있는 개발자들이 작성한 소프트웨어가 (사용자 대신) 소통의 다리 역할을 하고 있는 것이다.
아, 당신이 나처럼 소프트웨어 개발자일 것이라는 사실을 잊고 있었다.
'맞다' - 훌륭한 소프트웨어 개발자가 되려면 OS (또는 root file system)에 대해서 잘 알고 있어야 한다.


시작하기

Kernel 및 U-boot 빌드와 준비물은 크게 다르지 않다.
  1. 크로스컴파일을 위한 도구가 이미 설치되어 있다고 가정해보자. (링크 참고)
  2. 빌드루트 또한 오픈소스 개발자들이 착실하게 유지보수를 수행하며 공유하고 있다. 아래 링크에서 다운로드를 받아보자
    • https://buildroot.org/downloads/buildroot-2018.11.tar.gz
  3. 사실, buildroot를 기본부터 이해하려면 막막하지만, 이것도 mainline 의 영향인지 NanoPi 보드의 경우 configuration을 이미 가지고 있다. 단지 아래 명령을 실행하는 것만으로 u-boot, kernel, root-file-system 까지 한 번에 내려받고 컴파일까지 모두 완료된다. 심지어는 SD-card에 직접 쓸 수 있는 image file 까지 만들어 준다. (주>빌드 할 것이 매우 많기 때문에 시간이 오-래 걸린다)
    • make nanopi_neo_defconfig
    • make
  4. Boot log 를 확인해보면 official image와는 사뭇 다른 결과물이 얻어졌음을 알 수 있다.
  5. 
    In:    serial
    Out:   serial
    Err:   serial
    Net:   No ethernet found.
    starting USB...
    USB0:   USB EHCI 1.00                                           
    USB1:   USB OHCI 1.0                                            
    scanning bus 0 for devices... 1 USB Device(s) found             
    Hit any key to stop autoboot:  0                                
    switch to partitions #0, OK                                     
    mmc0 is current device
    Scanning mmc 0:1...
    Found U-Boot script /boot.scr
    reading /boot.scr
    299 bytes read in 19 ms (14.6 KiB/s)
    ## Executing script at 43100000
    reading zImage
    3588880 bytes read in 188 ms (18.2 MiB/s)
    reading sun8i-h3-nanopi-neo.dtb
    13833 bytes read in 26 ms (519.5 KiB/s)
    ## Flattened Device Tree blob at 43000000
       Booting using the fdt blob at 0x43000000
       Using Device Tree in place at 43000000, end 43006608
    
    Starting kernel ...
    
    [    0.000000] Booting Linux on physical CPU 0x0
    [    0.000000] Linux version 4.10.1 (iddev@iddev-ubuntu) (gcc version 7.3.0 (Buildroot 2018.11)8
    [    0.000000] CPU: ARMv7 Processor [410fc075] revision 5 (ARMv7), cr=10c5387d
    [    0.000000] CPU: div instructions available: patching division code
    [    0.000000] CPU: PIPT / VIPT nonaliasing data cache, VIPT aliasing instruction cache
    [    0.000000] OF: fdt:Machine model: FriendlyARM NanoPi NEO
    [    0.000000] Memory policy: Data cache writealloc
    [    0.000000] psci: probing for conduit method from DT.
    [    0.000000] psci: Using PSCI v0.1 Function IDs from DT
    [    0.000000] percpu: Embedded 14 pages/cpu @cffb5000 s24652 r8192 d24500 u57344
    [    0.000000] Built 1 zonelists in Zone order, mobility grouping on.  Total pages: 65024
    [    0.000000] Kernel command line: console=ttyS0,115200 earlyprintk root=/dev/mmcblk0p2 rootwat
    [    0.000000] PID hash table entries: 1024 (order: 0, 4096 bytes)
    [    0.000000] Dentry cache hash table entries: 32768 (order: 5, 131072 bytes)
    [    0.000000] Inode-cache hash table entries: 16384 (order: 4, 65536 bytes)
    [    0.000000] Memory: 250784K/262144K available (5120K kernel code, 308K rwdata, 1352K rodata,)
    [    0.000000] Virtual kernel memory layout:
    [    0.000000]     vector  : 0xffff0000 - 0xffff1000   (   4 kB)
    [    0.000000]     fixmap  : 0xffc00000 - 0xfff00000   (3072 kB)
    [    0.000000]     vmalloc : 0xd0800000 - 0xff800000   ( 752 MB)
    [    0.000000]     lowmem  : 0xc0000000 - 0xd0000000   ( 256 MB)
    [    0.000000]     pkmap   : 0xbfe00000 - 0xc0000000   (   2 MB)
    [    0.000000]     modules : 0xbf000000 - 0xbfe00000   (  14 MB)
    [    0.000000]       .text : 0xc0008000 - 0xc0600000   (6112 kB)
    [    0.000000]       .init : 0xc0800000 - 0xc0900000   (1024 kB)
    [    0.000000]       .data : 0xc0900000 - 0xc094d340   ( 309 kB)
    [    0.000000]        .bss : 0xc094f000 - 0xc0991934   ( 267 kB)
    [    0.000000] SLUB: HWalign=64, Order=0-3, MinObjects=0, CPUs=4, Nodes=1
    [    0.000000] Hierarchical RCU implementation.
    [    0.000000]  Build-time adjustment of leaf fanout to 32.
    [    0.000000]  RCU restricting CPUs from NR_CPUS=8 to nr_cpu_ids=4.
    [    0.000000] RCU: Adjusting geometry for rcu_fanout_leaf=32, nr_cpu_ids=4
    [    0.000000] NR_IRQS:16 nr_irqs:16 16
    [    0.000000] arm_arch_timer: Architected cp15 timer(s) running at 24.00MHz (phys).
    [    0.000000] clocksource: arch_sys_counter: mask: 0xffffffffffffff max_cycles: 0x588fe9dc0, ms
    [    0.000006] sched_clock: 56 bits at 24MHz, resolution 41ns, wraps every 4398046511097ns
    [    0.000017] Switching to timer-based delay loop, resolution 41ns
    [    0.000154] clocksource: timer: mask: 0xffffffff max_cycles: 0xffffffff, max_idle_ns: 796358s
    [    0.000375] Console: colour dummy device 80x30
    [    0.000406] Calibrating delay loop (skipped), value calculated using timer frequency.. 48.00)
    [    0.000419] pid_max: default: 32768 minimum: 301
    [    0.000522] Mount-cache hash table entries: 1024 (order: 0, 4096 bytes)
    [    0.000531] Mountpoint-cache hash table entries: 1024 (order: 0, 4096 bytes)
    [    0.001147] CPU: Testing write buffer coherency: ok
    [    0.001470] /cpus/cpu@0 missing clock-frequency property
    [    0.001483] /cpus/cpu@1 missing clock-frequency property
    [    0.001494] /cpus/cpu@2 missing clock-frequency property
    [    0.001504] /cpus/cpu@3 missing clock-frequency property
    [    0.001515] CPU0: thread -1, cpu 0, socket 0, mpidr 80000000
    [    0.001776] Setting up static identity map for 0x40100000 - 0x40100058
    [    0.002411] smp: Bringing up secondary CPUs ...
    [    0.013075] CPU1: thread -1, cpu 1, socket 0, mpidr 80000001
    [    0.023747] CPU2: thread -1, cpu 2, socket 0, mpidr 80000002
    [    0.034406] CPU3: thread -1, cpu 3, socket 0, mpidr 80000003
    [    0.034465] smp: Brought up 1 node, 4 CPUs
    [    0.034484] SMP: Total of 4 processors activated (192.00 BogoMIPS).
    [    0.034490] CPU: All CPU(s) started in HYP mode.
    [    0.034494] CPU: Virtualization extensions available.
    [    0.035177] devtmpfs: initialized
    [    0.038800] VFP support v0.3: implementor 41 architecture 2 part 30 variant 7 rev 5
    [    0.039021] clocksource: jiffies: mask: 0xffffffff max_cycles: 0xffffffff, max_idle_ns: 1911s
    [    0.039040] futex hash table entries: 1024 (order: 4, 65536 bytes)
    [    0.039283] pinctrl core: initialized pinctrl subsystem
    [    0.040158] NET: Registered protocol family 16
    [    0.040501] DMA: preallocated 256 KiB pool for atomic coherent allocations
    [    0.041529] hw-breakpoint: found 5 (+1 reserved) breakpoint and 4 watchpoint registers.
    [    0.041539] hw-breakpoint: maximum watchpoint size is 8 bytes.
    [    0.052278] SCSI subsystem initialized
    [    0.052715] usbcore: registered new interface driver usbfs
    [    0.052773] usbcore: registered new interface driver hub
    [    0.052827] usbcore: registered new device driver usb
    [    0.053034] pps_core: LinuxPPS API ver. 1 registered
    [    0.053041] pps_core: Software ver. 5.3.6 - Copyright 2005-2007 Rodolfo Giometti 
    [    0.053060] PTP clock support registered
    [    0.053267] Advanced Linux Sound Architecture Driver Initialized.
    [    0.054110] clocksource: Switched to clocksource arch_sys_counter
    [    0.062284] NET: Registered protocol family 2
    [    0.062780] TCP established hash table entries: 2048 (order: 1, 8192 bytes)
    [    0.062812] TCP bind hash table entries: 2048 (order: 2, 16384 bytes)
    [    0.062847] TCP: Hash tables configured (established 2048 bind 2048)
    [    0.062913] UDP hash table entries: 256 (order: 1, 8192 bytes)
    [    0.062956] UDP-Lite hash table entries: 256 (order: 1, 8192 bytes)
    [    0.063134] NET: Registered protocol family 1
    [    0.063507] RPC: Registered named UNIX socket transport module.
    [    0.063519] RPC: Registered udp transport module.
    [    0.063524] RPC: Registered tcp transport module.
    [    0.063529] RPC: Registered tcp NFSv4.1 backchannel transport module.
    [    0.065359] workingset: timestamp_bits=30 max_order=16 bucket_order=0
    [    0.073491] NFS: Registering the id_resolver key type
    [    0.073543] Key type id_resolver registered
    [    0.073549] Key type id_legacy registered
    [    0.074632] Block layer SCSI generic (bsg) driver version 0.4 loaded (major 249)
    [    0.074644] io scheduler noop registered
    [    0.074651] io scheduler deadline registered
    [    0.074799] io scheduler cfq registered (default)
    [    0.079676] sun8i-h3-pinctrl 1c20800.pinctrl: initialized sunXi PIO driver
    [    0.081399] sun8i-h3-r-pinctrl 1f02c00.pinctrl: initialized sunXi PIO driver
    [    0.135079] Serial: 8250/16550 driver, 8 ports, IRQ sharing disabled
    [    0.137773] console [ttyS0] disabled
    [    0.157952] 1c28000.serial: ttyS0 at MMIO 0x1c28000 (irq = 30, base_baud = 1500000) is a U6_A
    [    0.762813] console [ttyS0] enabled
    [    0.766828] [drm] Initialized
    [    0.770954] libphy: Fixed MDIO Bus: probed
    [    0.775085] CAN device driver interface
    [    0.779179] ehci_hcd: USB 2.0 'Enhanced' Host Controller (EHCI) Driver
    [    0.785715] ehci-platform: EHCI generic platform driver
    [    0.791131] ehci-platform 1c1d000.usb: EHCI Host Controller
    [    0.796745] ehci-platform 1c1d000.usb: new USB bus registered, assigned bus number 1
    [    0.804650] ehci-platform 1c1d000.usb: irq 24, io mem 0x01c1d000
    [    0.834135] ehci-platform 1c1d000.usb: USB 2.0 started, EHCI 1.00
    [    0.840984] hub 1-0:1.0: USB hub found
    [    0.844786] hub 1-0:1.0: 1 port detected
    [    0.849086] ohci_hcd: USB 1.1 'Open' Host Controller (OHCI) Driver
    [    0.855314] ohci-platform: OHCI generic platform driver
    [    0.860700] ohci-platform 1c1d400.usb: Generic Platform OHCI controller
    [    0.867343] ohci-platform 1c1d400.usb: new USB bus registered, assigned bus number 2
    [    0.875175] ohci-platform 1c1d400.usb: irq 25, io mem 0x01c1d400
    [    0.948781] hub 2-0:1.0: USB hub found
    [    0.952558] hub 2-0:1.0: 1 port detected
    [    0.957657] sun6i-rtc 1f00000.rtc: rtc core: registered rtc-sun6i as rtc0
    [    0.964458] sun6i-rtc 1f00000.rtc: RTC enabled
    [    0.969006] i2c /dev entries driver
    [    0.972694] IR NEC protocol handler initialized
    [    0.977233] IR RC5(x/sz) protocol handler initialized
    [    0.982276] IR RC6 protocol handler initialized
    [    0.986807] IR JVC protocol handler initialized
    [    0.991329] IR Sony protocol handler initialized
    [    0.995946] IR SANYO protocol handler initialized
    [    1.000642] IR Sharp protocol handler initialized
    [    1.005351] IR MCE Keyboard/mouse protocol handler initialized
    [    1.011173] IR XMP protocol handler initialized
    [    1.016203] sunxi-wdt 1c20ca0.watchdog: Watchdog enabled (timeout=16 sec, nowayout=0)
    [    1.024358] cpu cpu0: failed to get clock: -2
    [    1.028723] cpufreq-dt: probe of cpufreq-dt failed with error -2
    [    1.035585] sunxi-mmc 1c0f000.mmc: Got CD GPIO
    [    1.094130] sunxi-mmc 1c0f000.mmc: base:0xd0875000 irq:23
    [    1.100635] usbcore: registered new interface driver usbhid
    [    1.106234] usbhid: USB HID core driver
    [    1.110989] NET: Registered protocol family 17
    [    1.115492] can: controller area network core (rev 20120528 abi 9)
    [    1.121895] NET: Registered protocol family 29
    [    1.126352] can: raw protocol (rev 20120528)
    [    1.130619] can: broadcast manager protocol (rev 20161123 t)
    [    1.136289] can: netlink gateway (rev 20130117) max_hops=1
    [    1.141991] Key type dns_resolver registered
    [    1.146372] Registering SWP/SWPB emulation handler
    [    1.156056] sun6i-rtc 1f00000.rtc: setting system clock to 1970-01-01 00:00:06 UTC (6)
    [    1.164275] vcc3v0: disabling
    [    1.167245] vcc5v0: disabling
    [    1.170208] ALSA device list:
    [    1.173168]   No soundcards found.
    [    1.177201] Waiting for root device /dev/mmcblk0p2...
    [    1.204562] mmc0: host does not support reading read-only switch, assuming write-enable
    [    1.217527] mmc0: new high speed SDHC card at address aaaa
    [    1.223637] mmcblk0: mmc0:aaaa SU04G 3.69 GiB 
    [    1.231415]  mmcblk0: p1 p2
    [    1.264987] EXT4-fs (mmcblk0p2): couldn't mount as ext3 due to feature incompatibilities
    [    1.273704] EXT4-fs (mmcblk0p2): couldn't mount as ext2 due to feature incompatibilities
    [    1.282873] EXT4-fs (mmcblk0p2): INFO: recovery required on readonly filesystem
    [    1.290191] EXT4-fs (mmcblk0p2): write access will be enabled during recovery
    [    1.319718] random: fast init done
    [    1.338110] EXT4-fs (mmcblk0p2): recovery complete
    [    1.346671] EXT4-fs (mmcblk0p2): mounted filesystem with ordered data mode. Opts: (null)
    [    1.354829] VFS: Mounted root (ext4 filesystem) readonly on device 179:2.
    [    1.364537] devtmpfs: mounted
    [    1.368610] Freeing unused kernel memory: 1024K
    [    1.446305] EXT4-fs (mmcblk0p2): re-mounted. Opts: data=ordered
    Starting logging: OK
    Initializing random number generator... done.
    Starting network: OK
    
    Welcome to Buildroot for the NanoPi NEO
    nanopi-neo login:
    
이쯤 되면 역사와 의미 부터 구구절절 풀어냈던 '썰'이 무색해진다. (약간 치트키를 쓴 듯한 느낌?)
하지만, 이것 만으로는 뭔가 '했다'고 할수는 없으니 몇 가지를 추가적으로 시도해보자.

2018년 11월 29일 목요일

U-boot / Kernel build - powered by NanoPi NEO

AllWinner 사에서 만든 프로토타이핑 보드 NanoPi를 이용해 나만의 IoT 서버를 빌드해보자


준비물


  1. NanoPi NEO
    • https://www.friendlyarm.com/index.php?route=product/product&product_id=132
    • 세상에! 2만원도 안하는 가격에 (아두이노 정품 보드보다도 훨씬 싸다!) 무려 Quad core ARM 보드를 구할 수 있다.
    • 다양한 레퍼런스와 초보자 친화적인 개발환경이 목적이 아니라면 라즈베리파이보다 훨씬 좋은 솔루션이 될 수 있겠다. (HDMI 단자가 없는 것은 함정 :))
  2. Ubuntu 18.04
    • U-boot과 Linux Kernel을 빌드하기 위해서는 리눅스 환경이 필수적이다. 그 중에서도 설치가 가장 쉬운 Ubuntu 최신 버전으로 시작해보자.
  3. Cross-compiler
    • Pre-built compiler (특히 arm 계열의)는 수많은 종류가 있을테고, 취향에 따라서 컴파일러도 자신의 손으로 빌드해보는 재미(?)를 느껴보고 싶다면 옵션은 더욱 다양해진다. 하지만, 누군가가 추천해주신 pre-built compiler가 있다면 수많은 옵션을 테스트해보고 시행착오를 겪는 수고스러움을 건너 뛸 수 있다 :)
    • https://releases.linaro.org/components/toolchain/binaries/latest-7/arm-linux-gnueabihf/
  4. 소스코드
    • 고맙게도 NanoPi 보드류는 BSP 지원이 굉장히 잘 되고 있는 편이다. Pre-built image도 잘 구비가 되어있고, 소스코드도 Vendor provided BSP 뿐만 아니라 *Mainline 에서도 잘 지원되고 있다.
    • [제조사 제공 소스코드 및 가이드]
      • http://wiki.friendlyarm.com/wiki/index.php/Building_U-boot_and_Linux_for_H5/H3/H2%2B
      • https://github.com/friendlyarm/u-boot
      • https://github.com/friendlyarm/linux
    • [Pre-built image]
      • http://download.friendlyarm.com/nanopineo


환경설정

  1. 이제 언제 봐도 생소한 linux를 설치했으니 빌드환경 부터 갖춰야겠다.
    • 한 줄 인스톨 환경 셋업 스크립트
    • sudo apt-get install build-essential flex bison swig python-dev python3-dev
    • 행복한 코딩을 위해 깨알같은 유틸리티 설치도 빼먹지 말자
    • sudo apt-get install vim wget
  2. 크로스컴파일러 툴체인을 설치한다.
  3. wget https://releases.linaro.org/components/toolchain/binaries/latest-7/arm-linux-gnueabihf/gcc-linaro-7.3.1-2018.05-x86_64_arm-linux-gnueabihf.tar.xz
    tar xvf gcc-linaro-7.3.1-2018.05-x86_64_arm-linux-gnueabihf.tar.xz
    sudo mkdir /opt/toolchains
    sudo mv gcc-linaro-7.3.1-2018.05-x86_64_arm-linux-gnueabihf /opt/toolchains/arm-linux-gnueabihf
    echo export PATH=\$PATH:/opt/toolchains/arm-linux-gnueabihf/bin/ >> ~/.bashrc
    echo export ARCH=arm >> ~/.bashrc
    echo export CROSS_COMPILE=arm-linux-gnueabihf- >> ~/.bashrc
    
    • 위와 같이 입력하고 터미널을 다시 실행하면 번거로운 환경변수 작업이 다 적용되어 편하게 작업할 수 있다.


컴파일

  1. U-boot 소스코드를 받고 빌드해보자
  2. wget ftp://ftp.denx.de/pub/u-boot/u-boot-2018.11.tar.bz2
    tar xvf u-boot-2018.11.tar.bz2
    cd u-boot-2018.11
    make nanopi_neo_defconfig
    make
    
    • 읭? 끝났네? mainline의 위력을 실감하는 순간이다. 그런데... 너무 공부가 안되는건 함정.
    • 그래서 뭐? :( 뭐가 된건지 모르겠다. 나중에 정리해보자.
    • 모든 컴파일 작업이 완료되면 u-boot로 시작하는 여러 개의 파일이 생성되는데, 최종 결과물은 u-boot-sunxi-with-spl.bin 파일이다. 이걸 아래의 명령으로 SD 카드의 특정 위치에 기록하면 된다(고 한다).
  3. Kernel 소스코드를 받고 빌드해보자
  4. wget https://cdn.kernel.org/pub/linux/kernel/v4.x/linux-4.19.3.tar.xz
    tar xvf linux-4.19.3.tar.xz
    cd linux-4.19.3
    make sunxi_defconfig
    make zImage dtbs
    
    • 아 살짝 당황했다. Kernel에는 neopi가 없다;; 그런데 친절한 friendly arm wiki를 보니 sunxi_defconfig를 사용하면 된다는구나.
    • *Device tree 라는 시스템 덕에 같은 CPU family라면 동일한 kernel image로 구동할 수 있다. 보드 마다 다른 설정은 모두 *.dtb라는 파일에 기록되어 있다. 따라서 kernel image는 CPU family에서 공통으로 사용하는 파일을 사용하며, 앞서 살펴본 u-boot image파일과 비슷한 이름의 .dtb 파일을 찾아서 함께 사용하면 된다.
    • 이것도 마찬가지로 간단하게 컴파일 작업이 완료(시간은 무척 오래걸린다...)


부팅디스크 만들기

  1. 우선 파티션을 나눠야한다. 파티션 툴은 아주 오래전 DOS 시절 부터 친숙한 fdisk를 이용한다. 그간 진화한 fdisk의 복잡한 기능을 보니 세월이 느껴진다.
  2. fdisk /dev/sdb
    
    • fdisk의 기능도 하나 하나 익혀보고 싶지만, 당장 필요한 d, n, t, w 기능만 알아보자.
      • d: 파티션을 지운다. 별 생각 없이 d <enter>만 하면 차례 대로 선택지를 보여준다.
      • n: 파티션을 생성한다. 마찬가지로 단계별 질의에 답하면 된다.
      • t: 파티션의 속성(type)을 변경한다. 많은 종류의 타입이 있지만, 우리가 사용할 속성은 6: FAT16 (boot 파티션 커널 이미지가 들어갈 자리) 83: Linux (rootfs, 즉 root file system이 들어갈 자리) 두 가지 뿐이다.
      • p: 파티션 구성을 보여준다.
      • w: 파티션 구성을 저장한다. (돌이킬 수 없다-)
    • TIP
      • First/last sector 위치를 물어보는데 하나의 섹터가 512byte이니, 원래 대로라면 원하는 사이즈를 만들기 위해서는 차분히 계산을 해 넣어야겠지만 +100M와 같이 단위와 + 를 조합해 넣어주면 복잡한 계산 없이 간단히 해결된다.
      • lsblk명령을 사용하면 나눠진 파티션을 일목요연하게 정리해 보여준다. 좀더 자세한 내용이 필요한 경우 fdisk -l 명령을 사용한다.
  3. 파티션을 나누고 나면 부트섹터에는 u-boot를, 첫번째 마스터 파티션에는 kernel을, 그리고 마지막 파티션에는 root file system을 차례로 올리면 된다.
    • 첫번째. u-boot
    • sudo dd if=u-boot-sunxi-with-spl.bin of=/dev/sdb bs=1024 seek=8
      sudo sync && eject /dev/sdb
      • 여기에서는 system disk 하나만 설치되어 있고, 외장형 저장 장치도 MMC card reader 하나만 있을 때의 예를 들었다. 시스템 구성에 따라 /dev/sdc 위치에 설치해야할 수도 있다. MMC카드의 device path를 꼭 확인해보자
      • bs: block size, seek: # of blocks from origin -> 따라서 위 명령은 8k위치에서 부터 u-boot image를 기록하겠다는 뜻이다. CPU 구성에 따라 다르다고 하니 다른 시스템 구성에서 사용 할 경우에는 각각의 시스템에 맞는 위치에 기록해야한다.
    • 두번째. kernel
    • sudo mkfs.fat /dev/sdb1
      sudo mkdir /media/boot
      sudo mount /dev/sdb1 /media/boot
      sudo cp arch/arm/boot/zImage /media/boot/
      sudo cp arch/arm/boot/dts/sun8i-*-nanopi-*.dtb /media/boot/
      
      • Kernel의 경우 단순한 file system에 몇 개의 이미지 파일을 넣어두면 부트로더에서 읽어서 일련의 과정을 수행해주게 되어있다. FAT16 파일은 윈도우에서도 확인해볼 수 있는데, 어떤 환경에서건 그저 필요한 파일들을 복사해주면 된다. 이를 위해 mkfs.fat 등의 유틸리티를 사용해 포멧을 해주는 것을 잊지 말자.
      • 필요한 파일은 zImage (또는 uImage, Image 등의 kernel image file), *.btb 파일이다. 시스템에 맞는 파일만 복사해주면 된다.
      • 주)
    • 커널의 모듈 업데이트는 다음과 같이 root file system에 파일을 복사하면 된다. 이게 올바른 방법인지는 잘 모르겠다 :(
    • make modules
      make modules_install INSTALL_MOD_PATH=/media/rootfs/
      • 여기에서는 rootfs라는 볼륨이 있다고 가정했는데, 이것도 boot 볼륨과 마찬가지로 포멧하고, 필요한 파일을 적재하고 마운트도 해야한다.
    • 세번째. root file system
    • sudo dd if=rootfs.ext4 of=/dev/sdb2 bs=1M
      sudo sync && eject /dev/sdb
      • rootfs.ext4 라는 파일 이름으로 미리 구성된 root file system 이미지가 있다면 위와 같이 간단한 명령만으로 만들 수 있는데... 나만의 새로운 root file system 이미지를 만드는 방법은 다음 기회에 다시 알아보기로 한다.

완료

U-Boot SPL 2018.11 (Nov 29 2018 - 22:56:51 +0900)
DRAM: 256 MiB
Trying to boot from MMC1


U-Boot 2018.11 (Nov 29 2018 - 22:56:51 +0900) Allwinner Technology

CPU:   Allwinner H3 (SUN8I 1680)
Model: FriendlyARM NanoPi NEO
DRAM:  256 MiB
MMC:   SUNXI SD/MMC: 0
Loading Environment from FAT... *** Warning - bad CRC, using default environment

In:    serial
Out:   serial
Err:   serial
Net:   phy interface0

Error: ethernet@1c30000 address not set.
eth-1: ethernet@1c30000
starting USB...
USB0:   USB EHCI 1.00
USB1:   USB OHCI 1.0
USB2:   USB EHCI 1.00
USB3:   USB OHCI 1.0
scanning bus 0 for devices... 1 USB Device(s) found
scanning bus 2 for devices... 1 USB Device(s) found
       scanning usb for storage devices... 0 Storage Device(s) found
Hit any key to stop autoboot:  0
switch to partitions #0, OK
mmc0 is current device
Scanning mmc 0:1...
Found /extlinux/extlinux.conf
Retrieving file: /extlinux/extlinux.conf
183 bytes read in 4 ms (43.9 KiB/s)
Boot menu
1:      Default
Enter choice: 1:        Default
Retrieving file: /zImage
4032528 bytes read in 190 ms (20.2 MiB/s)
append: root=/dev/mmcblk0p2 console=ttyS0,115200n8
Retrieving file: /sun8i-h3-nanopi-neo.dtb
18907 bytes read in 3 ms (6 MiB/s)
## Flattened Device Tree blob at 43000000
   Booting using the fdt blob at 0x43000000
EHCI failed to shut down host controller.
   Loading Device Tree to 49ff8000, end 49fff9da ... OK

Starting kernel ...

[    0.000000] Booting Linux on physical CPU 0x0
[    0.000000] Linux version 4.19.3 (wsahn@wsahn-vm) (gcc version 7.3.1 20180425 [linaro-7.3-2018.05 revision d29120a424ecfbc167ef90065c0eeb7f91977701] (Linaro GCC 7.3-2018.05)) #1 SMP Thu Nov 29 23:42:18 KST 2018
[    0.000000] CPU: ARMv7 Processor [410fc075] revision 5 (ARMv7), cr=10c5387d
[    0.000000] CPU: div instructions available: patching division code
[    0.000000] CPU: PIPT / VIPT nonaliasing data cache, VIPT aliasing instruction cache
[    0.000000] OF: fdt: Machine model: FriendlyARM NanoPi NEO
[    0.000000] Memory policy: Data cache writealloc
[    0.000000] cma: Reserved 16 MiB at 0x4ec00000
[    0.000000] psci: probing for conduit method from DT.
[    0.000000] psci: Using PSCI v0.1 Function IDs from DT
[    0.000000] random: get_random_bytes called from start_kernel+0xa0/0x3f8 with crng_init=0
[    0.000000] percpu: Embedded 16 pages/cpu @(ptrval) s34572 r8192 d22772 u65536
[    0.000000] Built 1 zonelists, mobility grouping on.  Total pages: 65024
[    0.000000] Kernel command line: root=/dev/mmcblk0p2 console=ttyS0,115200n8
[    0.000000] Dentry cache hash table entries: 32768 (order: 5, 131072 bytes)
[    0.000000] Inode-cache hash table entries: 16384 (order: 4, 65536 bytes)
[    0.000000] Memory: 233228K/262144K available (6144K kernel code, 419K rwdata, 1520K rodata, 1024K init, 242K bss, 12532K reserved, 16384K cma-reserved, 0K highmem)
[    0.000000] Virtual kernel memory layout:
[    0.000000]     vector  : 0xffff0000 - 0xffff1000   (   4 kB)
[    0.000000]     fixmap  : 0xffc00000 - 0xfff00000   (3072 kB)
[    0.000000]     vmalloc : 0xd0800000 - 0xff800000   ( 752 MB)
[    0.000000]     lowmem  : 0xc0000000 - 0xd0000000   ( 256 MB)
[    0.000000]     pkmap   : 0xbfe00000 - 0xc0000000   (   2 MB)
[    0.000000]     modules : 0xbf000000 - 0xbfe00000   (  14 MB)
[    0.000000]       .text : 0x(ptrval) - 0x(ptrval)   (7136 kB)
[    0.000000]       .init : 0x(ptrval) - 0x(ptrval)   (1024 kB)
[    0.000000]       .data : 0x(ptrval) - 0x(ptrval)   ( 420 kB)
[    0.000000]        .bss : 0x(ptrval) - 0x(ptrval)   ( 243 kB)
[    0.000000] SLUB: HWalign=64, Order=0-3, MinObjects=0, CPUs=4, Nodes=1
[    0.000000] rcu: Hierarchical RCU implementation.
[    0.000000] rcu:     RCU restricting CPUs from NR_CPUS=8 to nr_cpu_ids=4.
[    0.000000] rcu: Adjusting geometry for rcu_fanout_leaf=16, nr_cpu_ids=4
[    0.000000] NR_IRQS: 16, nr_irqs: 16, preallocated irqs: 16
[    0.000000] GIC: Using split EOI/Deactivate mode
[    0.000000] clocksource: timer: mask: 0xffffffff max_cycles: 0xffffffff, max_idle_ns: 79635851949 ns
[    0.000000] arch_timer: cp15 timer(s) running at 24.00MHz (phys).
[    0.000000] clocksource: arch_sys_counter: mask: 0xffffffffffffff max_cycles: 0x588fe9dc0, max_idle_ns: 440795202592 ns
[    0.000007] sched_clock: 56 bits at 24MHz, resolution 41ns, wraps every 4398046511097ns
[    0.000018] Switching to timer-based delay loop, resolution 41ns
[    0.000180] Console: colour dummy device 80x30
[    0.000230] Calibrating delay loop (skipped), value calculated using timer frequency.. 48.00 BogoMIPS (lpj=240000)
[    0.000243] pid_max: default: 32768 minimum: 301
[    0.000387] Mount-cache hash table entries: 1024 (order: 0, 4096 bytes)
[    0.000400] Mountpoint-cache hash table entries: 1024 (order: 0, 4096 bytes)
[    0.001011] CPU: Testing write buffer coherency: ok
[    0.001423] /cpus/cpu@0 missing clock-frequency property
[    0.001445] /cpus/cpu@1 missing clock-frequency property
[    0.001464] /cpus/cpu@2 missing clock-frequency property
[    0.001483] /cpus/cpu@3 missing clock-frequency property
[    0.001496] CPU0: thread -1, cpu 0, socket 0, mpidr 80000000
[    0.001986] Setting up static identity map for 0x40100000 - 0x40100060
[    0.002134] rcu: Hierarchical SRCU implementation.
[    0.002811] smp: Bringing up secondary CPUs ...
[    0.013543] CPU1: thread -1, cpu 1, socket 0, mpidr 80000001
[    0.024366] CPU2: thread -1, cpu 2, socket 0, mpidr 80000002
[    0.035096] CPU3: thread -1, cpu 3, socket 0, mpidr 80000003
[    0.035176] smp: Brought up 1 node, 4 CPUs
[    0.035198] SMP: Total of 4 processors activated (192.00 BogoMIPS).
[    0.035204] CPU: All CPU(s) started in HYP mode.
[    0.035210] CPU: Virtualization extensions available.
[    0.036036] devtmpfs: initialized
[    0.040169] VFP support v0.3: implementor 41 architecture 2 part 30 variant 7 rev 5
[    0.040381] clocksource: jiffies: mask: 0xffffffff max_cycles: 0xffffffff, max_idle_ns: 19112604462750000 ns
[    0.040403] futex hash table entries: 1024 (order: 4, 65536 bytes)
[    0.041241] pinctrl core: initialized pinctrl subsystem
[    0.042143] NET: Registered protocol family 16
[    0.043481] DMA: preallocated 256 KiB pool for atomic coherent allocations
[    0.044480] hw-breakpoint: found 5 (+1 reserved) breakpoint and 4 watchpoint registers.
[    0.044493] hw-breakpoint: maximum watchpoint size is 8 bytes.
[    0.056651] SCSI subsystem initialized
[    0.057143] usbcore: registered new interface driver usbfs
[    0.057188] usbcore: registered new interface driver hub
[    0.057252] usbcore: registered new device driver usb
[    0.057440] pps_core: LinuxPPS API ver. 1 registered
[    0.057448] pps_core: Software ver. 5.3.6 - Copyright 2005-2007 Rodolfo Giometti 
[    0.057467] PTP clock support registered
[    0.057676] Advanced Linux Sound Architecture Driver Initialized.
[    0.058447] clocksource: Switched to clocksource arch_sys_counter
[    0.065647] NET: Registered protocol family 2
[    0.066146] tcp_listen_portaddr_hash hash table entries: 512 (order: 0, 6144 bytes)
[    0.066183] TCP established hash table entries: 2048 (order: 1, 8192 bytes)
[    0.066222] TCP bind hash table entries: 2048 (order: 2, 16384 bytes)
[    0.066258] TCP: Hash tables configured (established 2048 bind 2048)
[    0.066366] UDP hash table entries: 256 (order: 1, 8192 bytes)
[    0.066413] UDP-Lite hash table entries: 256 (order: 1, 8192 bytes)
[    0.066600] NET: Registered protocol family 1
[    0.067089] RPC: Registered named UNIX socket transport module.
[    0.067101] RPC: Registered udp transport module.
[    0.067107] RPC: Registered tcp transport module.
[    0.067113] RPC: Registered tcp NFSv4.1 backchannel transport module.
[    0.068813] workingset: timestamp_bits=30 max_order=16 bucket_order=0
[    0.075211] NFS: Registering the id_resolver key type
[    0.075251] Key type id_resolver registered
[    0.075258] Key type id_legacy registered
[    0.076230] Block layer SCSI generic (bsg) driver version 0.4 loaded (major 248)
[    0.076245] io scheduler noop registered
[    0.076253] io scheduler deadline registered
[    0.076404] io scheduler cfq registered (default)
[    0.076413] io scheduler mq-deadline registered
[    0.076420] io scheduler kyber registered
[    0.077168] sun4i-usb-phy 1c19400.phy: Couldn't request ID GPIO
[    0.080857] sun8i-h3-pinctrl 1c20800.pinctrl: initialized sunXi PIO driver
[    0.082428] sun8i-h3-r-pinctrl 1f02c00.pinctrl: initialized sunXi PIO driver
[    0.130453] Serial: 8250/16550 driver, 8 ports, IRQ sharing disabled
[    0.132794] console [ttyS0] disabled
[    0.152956] 1c28000.serial: ttyS0 at MMIO 0x1c28000 (irq = 35, base_baud = 1500000) is a U6_16550A
[    0.796602] console [ttyS0] enabled
[    0.802999] libphy: Fixed MDIO Bus: probed
[    0.807101] CAN device driver interface
[    0.811443] dwmac-sun8i 1c30000.ethernet: PTP uses main clock
[    0.817217] dwmac-sun8i 1c30000.ethernet: No regulator found
[    0.823276] dwmac-sun8i 1c30000.ethernet: Current syscon value is not the default 148000 (expect 58000)
[    0.832708] dwmac-sun8i 1c30000.ethernet: No HW DMA feature register supported
[    0.839936] dwmac-sun8i 1c30000.ethernet: RX Checksum Offload Engine supported
[    0.847148] dwmac-sun8i 1c30000.ethernet: COE Type 2
[    0.852118] dwmac-sun8i 1c30000.ethernet: TX Checksum insertion supported
[    0.858910] dwmac-sun8i 1c30000.ethernet: Normal descriptors
[    0.864562] dwmac-sun8i 1c30000.ethernet: Chain mode enabled
[    0.870379] libphy: stmmac: probed
[    0.874265] dwmac-sun8i 1c30000.ethernet: Found internal PHY node
[    0.880486] libphy: mdio_mux: probed
[    0.884073] dwmac-sun8i 1c30000.ethernet: Switch mux to internal PHY
[    0.890458] dwmac-sun8i 1c30000.ethernet: Powering internal PHY
[    0.897370] libphy: mdio_mux: probed
[    0.901286] ehci_hcd: USB 2.0 'Enhanced' Host Controller (EHCI) Driver
[    0.907806] ehci-platform: EHCI generic platform driver
[    0.913207] ehci-platform 1c1a000.usb: EHCI Host Controller
[    0.918812] ehci-platform 1c1a000.usb: new USB bus registered, assigned bus number 1
[    0.926870] ehci-platform 1c1a000.usb: irq 26, io mem 0x01c1a000
[    0.968437] ehci-platform 1c1a000.usb: USB 2.0 started, EHCI 1.00
[    0.975260] hub 1-0:1.0: USB hub found
[    0.979059] hub 1-0:1.0: 1 port detected
[    0.983600] ohci_hcd: USB 1.1 'Open' Host Controller (OHCI) Driver
[    0.989815] ohci-platform: OHCI generic platform driver
[    0.995182] ohci-platform 1c1a400.usb: Generic Platform OHCI controller
[    1.001821] ohci-platform 1c1a400.usb: new USB bus registered, assigned bus number 2
[    1.009747] ohci-platform 1c1a400.usb: irq 27, io mem 0x01c1a400
[    1.083094] hub 2-0:1.0: USB hub found
[    1.086870] hub 2-0:1.0: 1 port detected
[    1.094516] sun6i-rtc 1f00000.rtc: rtc core: registered rtc-sun6i as rtc0
[    1.101326] sun6i-rtc 1f00000.rtc: RTC enabled
[    1.105922] i2c /dev entries driver
[    1.110343] sunxi-wdt 1c20ca0.watchdog: Watchdog enabled (timeout=16 sec, nowayout=0)
[    1.119628] sunxi-mmc 1c0f000.mmc: Linked as a consumer to regulator.2
[    1.126719] sunxi-mmc 1c0f000.mmc: Got CD GPIO
[    1.156525] sunxi-mmc 1c0f000.mmc: initialized, max. request size: 16384 KB
[    1.164723] usbcore: registered new interface driver usbhid
[    1.170322] usbhid: USB HID core driver
[    1.175392] NET: Registered protocol family 17
[    1.179879] can: controller area network core (rev 20170425 abi 9)
[    1.186141] NET: Registered protocol family 29
[    1.190596] can: raw protocol (rev 20170425)
[    1.194863] can: broadcast manager protocol (rev 20170425 t)
[    1.200536] can: netlink gateway (rev 20170425) max_hops=1
[    1.206231] Key type dns_resolver registered
[    1.210590] Registering SWP/SWPB emulation handler
[    1.224181] ehci-platform 1c1d000.usb: EHCI Host Controller
[    1.229847] ehci-platform 1c1d000.usb: new USB bus registered, assigned bus number 3
[    1.238044] ehci-platform 1c1d000.usb: irq 28, io mem 0x01c1d000
[    1.266176] mmc0: host does not support reading read-only switch, assuming write-enable
[    1.268438] ehci-platform 1c1d000.usb: USB 2.0 started, EHCI 1.00
[    1.279662] mmc0: new high speed SDHC card at address aaaa
[    1.281101] hub 3-0:1.0: USB hub found
[    1.286843] mmcblk0: mmc0:aaaa SU04G 3.69 GiB
[    1.289665] hub 3-0:1.0: 1 port detected
[    1.299097] ohci-platform 1c1d400.usb: Generic Platform OHCI controller
[    1.301341]  mmcblk0: p1 p2
[    1.305745] ohci-platform 1c1d400.usb: new USB bus registered, assigned bus number 4
[    1.316708] ohci-platform 1c1d400.usb: irq 29, io mem 0x01c1d400
[    1.393178] hub 4-0:1.0: USB hub found
[    1.396971] hub 4-0:1.0: 1 port detected
[    1.401783] usb_phy_generic usb_phy_generic.0.auto: usb_phy_generic.0.auto supply vcc not found, using dummy regulator
[    1.412607] usb_phy_generic usb_phy_generic.0.auto: Linked as a consumer to regulator.0
[    1.421270] sun6i-rtc 1f00000.rtc: setting system clock to 1970-01-01 00:00:09 UTC (9)
[    1.429492] vcc3v0: disabling
[    1.432464] vcc5v0: disabling
[    1.435430] ALSA device list:
[    1.438391]   No soundcards found.
[    1.450949] EXT4-fs (mmcblk0p2): INFO: recovery required on readonly filesystem
[    1.458257] EXT4-fs (mmcblk0p2): write access will be enabled during recovery
[    1.570369] random: fast init done
[    1.612361] EXT4-fs (mmcblk0p2): recovery complete
[    1.620771] EXT4-fs (mmcblk0p2): mounted filesystem with ordered data mode. Opts: (null)
[    1.628929] VFS: Mounted root (ext4 filesystem) readonly on device 179:2.
[    1.637633] devtmpfs: mounted
[    1.641765] Freeing unused kernel memory: 1024K
[    1.646442] Run /sbin/init as init process
[    1.758717] EXT4-fs (mmcblk0p2): re-mounted. Opts: (null)
Starting logging: OK
Initializing random number generator... [    1.874008] random: dd: uninitialized urandom read (512 bytes read)
done.

Suprema Academy
s-academy login:

---

Mainline 이란?

  • 오픈소스 운영체제 개발 쪽에서는 메인스트림에 해당하는 오픈소스 브랜치를 메인라인이라고 부르는 듯 하다.
  • 코드가 굉장히 정리가 잘 되어 있고, 몇 가지 요건만 갖추면 오류없는 깨끗한 빌드 경험을 할 수 있다.
  •  [U-boot] http://linux-sunxi.org/Mainline_U-Boot
  •  [Kernel] http://linux-sunxi.org/Mainline_Kernel_Howto

zImage / Image / uImage ?

  • Kernel image는 타겟 이름에 따라 저장 속성이 정해진다. zImage는 압축된 것. 나머지는 차이를 모르겠...

dtb ?

  • Device tree blob: 과거의 kernel은 동일한 CPU에 대해 장치 드라이버는 공용으로 사용했지만, 보드마다 구성이 달라 새로운 보드를 개발하면 kernel을 항상 다시 컴파일해야하는 문제가 있었다. --CPU pin을 uart/gpio/spi/i2c 등 앞서 사용한 보드와 다른 목적으로 사용하려면 소스코드에 반영하고 빌드해야 함, 마찬가지 이유로 memory/static storage 증설 시 address mapping을 위해 다시 빌드-- Bootloader 또한 하드웨어에 맞게 다시 빌드해서 사용해야하며, bootloader가 kernel에 하드웨어 정보를 전달하는 데도 유연하지 못한 구조였다. 현대의 kernel system에서는 device tree라는 별도의 구조체를 정의하여 이런 문제를 해결하고자 한다.
    • DTB: Device tree blob
    • DTC: Device tree compiler
    • DTS: Device tree source(specification)
    • DTB = DTC(DTS)
  • 참고자료
    • https://en.wikipedia.org/wiki/Device_tree
    • https://elinux.org/images/f/f9/Petazzoni-device-tree-dummies_0.pdf
    • http://selfish-developer.com/entry/%EB%94%94%EB%B0%94%EC%9D%B4%EC%8A%A4%ED%8A%B8%EB%A6%ACDevice-Tree
    • http://blog.naver.com/PostView.nhn?blogId=ham9627&logNo=220561187536&parentCategoryNo=&categoryNo=30&viewDate=&isShowPopularPosts=true&from=search

2018년 11월 14일 수요일

YOLO 설치 및 경험해보기

딥러닝의 강력한 툴 중에 하나인 YOLO를 경험해 보면서 겪었던 trouble에 대해서 정리해 보기로 한다. 리눅스 환경에 익수한 사용자라면 darknet에 나온 설명만 따라하면 쉽게 시작할 수 있겠지만, 나와같이 리눅스 문외한을 위해 또 나의 부족한 기억력을 위해 YOLO 설치 과정을 정리하기로 한다.


1. 시작하며


YOLO를 실행시키기 위해서는 Darknet이 필요하다. Darknet은 Joseph Redmon이 독자 개발한 신경망 프레임워크(neural network framework)로서 dnn(deep neural network)들을 학습시키고 실행시킬 수 있는 프레임워크다. Darknet을 이용하면 기존 정통 주류의 dnn 모델, 예를 들어, AlexNet, VGG-16, Resnet, Densenet 등 들도 돌려 볼 수 있다. YOLO 역시 Darknet을 통해 학습된 신경망 중 하나이다.


2. YOLO 설치 및 실행


앞서 말했듯이, YOLO를 설치하기 위해서는 Darknet을 먼저 설치해야한다. Darknet은 아래와 같이 git에서 다운받을 수 있다. 다운로드가 완료되면 darknet 폴더로 이동 후, make 명령어를 입력하여 코드를 Compile한다. 컴파일이 완료되면 폴더에 darknet이라는 실행파일이 만들어진다.

     git clone https://github.com/pjreddie/darknet.git
     cd darknet
     make


2.1 설치 옵션


make 명령어 실행 전, 아래와 같이 Makefile을 수정하여 설치 옵션을 변경할 수 있다.


  • CUDA를 설치 했다면, GPU=1
  • OpenCV를 설치 했다면, OPENCV=1
  • 둘 다 설치 안된 경우에는 OPENCV=0, GPU=0으로 설정


2.2 YOLO 실행


위 과정까지 마무리 되었다면 Darknet 및 YOLO의 설치는 끝났다. git에서 다운받은 Darknet에는 예제로 주어진 딥러닝 모델과 weight들이 제공되고 있어 쉽게 YOLO의 동작을 검증해볼 수 있다. 그 예는 Darknet 홈페이지(https://pjreddie.com/darknet/install/)를 참조하면 쉽게 시도해볼 수 있다.


3. YOLO 윈도우즈 버전


git은 없는 소스코드 빼고 필요한 모든 소스코드가 제공되는 것 같다. 나와같이 Windows-friendly한 사람을 위한 YOLO 윈도우즈 버전 설치방법을 안내한다.


3.1 소스코드 다운받기


YOLO 윈도우즈 버전은 아래 git에서 다운받을 수 있다. 이 버전은 YOLO 윈도우즈 버전 뿐만 아니라 리눅스 버전을 포함하며, 현재(2018.11.15) 기준 Yolo-v3와 Yolo-v2를 모두 지원한다.

  • YOLO 윈도우 버전: https://github.com/AlexeyAB/darknet/

3.2 소스코드 빌드하기

위에서 언급한 git에 접속하면 windows와 linux에서 build하는 방법을 자세하게 설명하고 있다. windows 설치 방법은 아래 사이트를 참조하면 쉽게 이해할 것이다.

  • YOLO windows 버전 설치 안내: https://github.com/AlexeyAB/darknet/#how-to-compile-on-windows

[Windows build 환경]


Windows 환경에서 YOLO를 빌드하기 위해서는 MSVS2015와 OpenCV 3.4.0 이전 버전 (3.4.1버전에서는 버그 발생)이 기본적으로 설치되어 있어야 한다. 빌드 환경은 x64, release mode이다. 본인 PC에서는 OpenCV 3.0.0을 사용하였다.


  • CUDA9.1, cuDNN7.0이 설치된 경우

MSVS2015에서 build\darknet\darknet.sln 파일을  열고 빌드한다. 만약, CUDA9.1 버전이 아닌 경우에는 build\darknet\darknet.vcxproj 파일을 열어서 "CUDA 9.1"로 되어 있는 곳을  현재 Winodws에 설치된 "CUDA version"으로 수정하면 된다. 본인의 PC에는 CUDA 9.0, cuDNN7.3.0이 설치되었고, 빌드도 성공하였다.


  • GPU가 없는 경우

MSVS2015에서 build\darknet\darknet_no_gpu.sln 파일을  열고 빌드한다. 이 경우, CPU만으로 YOLO가 실행되어 속도가 느리지만 실행하는데에는 문제가 없다.


이상, 나의 기억력을 불신하여 리눅스 및 Windows 환경에서 YOLO를 설치하고 실행하는 예제를 정리한 글을 마칩니다.

2018년 11월 1일 목요일

Keras 소개

앞으로의 딥러닝 과제에서는 Keras를 이용해서 알고리즘을 구현하려고 합니다. 이에, Keras에 주요 특징들에 대해 간략하게 소개합니다. 이 내용은 아래 블로그를 요약/정리한 것으로, 자세한 내용은 아래 링크를 참고하세요.


Abstract


Keras는 구글 엔지니어인 프랑소와 쏠레(François Chollet)가 개발한 파이썬 기반의 딥러닝 라이브러리입니다. 딥러닝 비전문가라도 각자 분야에서 손쉽게 딥러닝 모델을 개발하고 활용할 수 있도록 Keras는 직관적인 API를 제공하고 있습니다.

내부적으로는 텐서플로우(TensorFlow), 티아노(Theano), CNTK 등의 딥러닝 전용 엔진이 구동되지만, Keras 사용자는 복잡한 내부 엔진을 알 필요는 없습니다. 직관적인 API로 쉽게 다층퍼셉트론 모델, 컨볼루션 신경망 모델, 순환 신경망 모델 또는 이를 조합한 모델은 물론 다중 입력 또는 다중 출력 등 다양한 구성을 할 수 있습니다.


Keras의 주요 특징

1. 모듈화 (Modularity)

Keras에서 제공하는 모듈은 독립적이고 설정 가능하며, 가능한 최소한의 제약사항으로 서로 연결할 수 있습니다. 모델은 시퀀스 또는 그래프로 이러한 모듈들을 구성한 것입니다.
특히, 신경망 층, 비용함수, 최적화기, 초기화기법, 활성화함수, 정규화기법은 모두 독립적인 모듈이며, 새로운 모델을 만들기 위해 이러한 모듈을 조합할 수 있습니다.


2. 최소주의 (Minimalism)

각 모듈은 짥고 간결합니다. 모든 코드는 한 번 훑어보는 것으로도 이해가능해야 합니다. 단, 반복 속도와 혁신성에는 다소 떨어질 수가 있습니다. (재사용성이 높은 노드 구성 vs. 효율적인 노드 구성  / 간결성 vs. 설계 유연성 - commented by wsahn)


3. 쉬운 확장성

새로운 클래스나 함수로 모듈을 아주 쉽게 추가할 수 있습니다. 따라서 고급 연구에 필요한 다양한 표현을 할 수 있습니다.


4. 파이썬 기반

Caffe 처럼 별도의 모델 설정 파일이 필요없으며 파이썬 코드로 모델들이 정의됩니다.


Keras 기본 개념


Keras의 가장 핵심적인 데이터 구조는 바로 모델입니다. Keras에서 제공하는 시퀀스 모델로 원하는 레이어를 쉽게 순차적으로 쌓을 수 있습니다. 다중 출력이 필요하는 등 좀 더 복잡한 모델을 구성하려면 Keras 함수 API를 사용하면 됩니다. Keras로 딥러닝 모델을 만들 때는 다음과 같은 순서로 작성합니다. 다른 딥러닝 라이브러리와 비슷한 순서이지만 훨씬 직관적이고 간결합니다.

1.데이터셋 생성하기

  • 원본 데이터를 불러오거나 시뮬레이션을 통해 데이터를 생성합니다. 
  • 데이터로부터 훈련셋, 검증셋, 시험셋을 생성합니다.
  • 이 때 딥러닝 모델의 학습 및 평가를 할 수 있도록 포맷 변환을 합니다.


2.모델 구성하기

  • 시퀀스 모델을 생성한 뒤 필요한 레이어를 추가하여 구성합니다.
  • 좀 더 복잡한 모델이 필요할 때는 케라스 함수 API를 사용합니다.

3. 모델 학습과정 설정하기

  • 학습하기 전에 학습에 대한 설정을 수행합니다.
  • 손실 함수 및 최적화 방법을 정의합니다.
  • 케라스에서는 compile() 함수를 사용합니다.

4. 모델 학습시키기

  • 훈련셋을 이용하여 구성한 모델로 학습시킵니다.
  • 케라스에서는 fit() 함수를 사용합니다.

5. 학습과정 살펴보기

  • 모델 학습 시 훈련셋, 검증셋의 손실 및 정확도를 측정합니다.
  • 반복횟수에 따른 손실 및 정확도 추이를 보면서 학습 상황을 판단합니다.

6. 모델 평가하기

  • 준비된 시험셋으로 학습한 모델을 평가합니다.
  • 케라스에서는 evaluate() 함수를 사용합니다.

7. 모델 사용하기

  • 임의의 입력으로 모델의 출력을 얻습니다.
  • 케라스에서는 predict() 함수를 사용합니다.

2018년 10월 25일 목요일

[요약] 밑바닥부터 시작하는 딥러닝 (Deep Learning from Scratch)

Deep-learning 기반의 face detection & recognition 개발을 위해 deep-learning 기술의 기본이 되는 용어 및 관련 내용을 우선 정리하도록 합니다.


1. Python 설치

Python을 설치하는 다양한 방법이 있지만, 일반적으로 Anaconda 배포판 이용을 권장한다. 본인은 가장 최신의 Anaconda 버전을 설치했다.


2. 퍼셉트론(Perceptron)

퍼셉트론은 다수의 신호를 입력받아 하나의 신호를 출력하는 것을 의미한다. 그림 2-1은 입력 2개의 신호를 받는 퍼셉트론의 예이다. 그림 2-1의 원을 뉴런 또는 노드라고 부른다.


x1, x2는 입력신호, y는 출력신호, 그리고 w1, w2는 가중치를 뜻한다. 퍼셉트론에서 가중치의 설정은 사람에 의해서 수동으로 설정해야 한다.


3. 신경망(Neural Network)

신경망은 그림 3-1과 같이 표현할 수 있다. 퍼셉트론과 비슷하지만, 가중치 매개변수의 값을 입력 데이터로부터 자동으로 학습하는 능력이 있다.


그림 3-1에서 가장 왼쪽 줄을 입력층, 맨 오른쪽 줄을 출력층, 중간 줄을 은닉칭(hidden layer)라고 한다.  은닉층의 뉴런은 사람의 눈에는 띄지 않는다.


3.1 활성화 함수(Activation Function)

입력신호의 총합을 출력신호로 변환해주는 함수를 의미한다. "활성화"라는 이름이 의미하듯 활성화 함수는 입력신호의 총합이 활성화를 일으키는지를 정하는 역할을 한다.


3.2 시그모이드(Sigmoid) 함수

신경망에서 가장 많이 사용하는 활성화 함수이다. 식과 그래프는 아래와 같다.


3.3 ReLU(Rectified Linear Unit) 함수

최근에는 ReLU 함수를 활성화 함수로 주로 이용한다. ReLU는 아래 그림과 같이 입력이 0을 넘으면 그 입력을 그대로 출력하고, 0 이하면 0을 출력하는 함수이다.


3.4 출력층 설계

3.4.1 항등(Identity) 함수

회귀에서 사용하는 함수로 입력과 출력이 항상 같다는 뜻의 항등이다. 그래서 아래 그림과 같이 출력층에서 항등 함수를 사용하면 입력신호가 그대로 출력신호가 된다.

3.4.2 소프트맥스(Softmax) 함수

분류에서 주로 사용하는 함수로 그림과 같이 출력층의 각 뉴런은 모든 입력신호에 영향을 받는다. 특히, 소프트맥스의 출력은 0에서 1사이 실수를 가지며 확률로 해석할 수 있다.


3.5 배치 처리(Batch Process)

다수의 입력을 하나로 묶은 데이터를 배치(batch)라고 합니다. 배치 처리는 큰 배열로 이뤄진 계산을 수행하는데, 컴퓨터에서는 큰 배열을 한번에 계산하는 것이 작은 배열을 여러번 계산하는 것보다 효율적입니다.


4. 신경망 학습

신경망의 특징은 데이터를 보고 학습할 수 있다는 것이다. 데이터에서 학습한다는 것은 가중치 매개변수의 값을 데이터를 보고 자동으로 결정한다는 것을 의미한다.

4.1 훈련 데이터와 시험 데이터

기계학습 문제는 데이터를 훈련 데이터시험 데이터로 나누어서 학습과 실험을 수행한다. 우선, 훈련 데이터만 사용하여 학습하면서 최적의 매개 변수를 찾고, 그 다음 시험 데이터를 사용하여 훈련된 모델의 성능을 평가한다.

*오버피팅(Overfitting) 하나의 데이터 셋에만 지나치게 최적화된 상태를 의미한다. 오버피팅 피하기는 기계학습의 중요한 과제이다.


4.2 손실함수(Loss Function)

신경망 학습에서는 현재 상태를 하나의 지표로 표현한다. 그리고 그 지표를 가장 좋게 만들어주는 가중치 매개변수의 값을 탐색하는 것이다. 신경망 학습에서는 손실함수를 사용하며, 일반적으로 평균 제곱 오차교차 엔트로피 오차를 사용한다.


*미니배치(mini-batch) 학습 신경망 학습 시, 데이터 전체가 아닌 일부를 추려 근사치로 이용하여 학습을 수행하는 것을 의미한다.


*매개변수 갱신 미니배치의 손실함수 크기를 줄이기 위해 각 가중치 매개변수의 기울기(즉, 수치미분)를 계산하고, 손실함수의 크기를 작게 하는 방향으로 가중치 매개 변수를 조금씩 갱신한다. (ex., SGD, 모멘텀, AdaGrad, Adam)


*오차역전법(back-propagation) 가중치 매개변수의 기울기를 효율적으로 계산하는 방법


*가중치 초기값 초기값을 무작위로 설정하는 것이 필요하다. Xavier, He(ReLU에 특화된 초기값) 등을 사용한다.


*배치 정규화(Batch Normalization) 신경망의 각 층이 활성화를 적당히 퍼뜨리도록 강제하는 방법으로, 학습 속도가 빠르고 초기값에 크게 의존하지 않으며 오버피팅을 억제하는 것이 특징이다.


*드롭아웃(Dropout) 오버피팅을 억제하기 위해 뉴런을 임의로 삭제하면서 학습하는 방식으로 앙상블 학습과 비슷한 효과를 나타낸다.


5. 합성곱 신경망(Convolutional Neural Network, CNN)

CNN은 이미지 인식과 음성 인식 등 다양한 곳에서 사용된다. 특히, 이미지 인식 분야에서는 딥러닝을 활용한 기법은 대부분 CNN을 기초로 한다.
CNN의 네트워크는 기존 신경망 구조와 비슷하지만, 합성곱 계층(convolutional layer)과 풀링 계층(pooling layer)이 새롭게 등장한다.


5.1 합성곱 연산

영상처리에서 말하는 필터 연산을 의미한다. 종종, 필터는 커널이라고도 한다.
합성곱 연산은 필터의 윈도우를 일정 간격으로 이동하면서 입력 데이터에 적용하여 입력과 필터에서 대응하는 원소끼리 곱한 후 그 총합을 계산한다. (그림 7-3 참조)


5.2 패딩(Padding)

합성곱 연산을 수행하기 전 입력 데이터 주변에 특정 값으로 채우는 것을 의미한다. 주로 출력의 크기를 조정할 목적으로 사용한다.


5.3 스트라이드(Stride)

필터를 적용하는 위치의 간격을 의미한다. 예를 들어, 스트라이드를 2로 하면 필터를 적용하는 윈도우가 두 칸씩 이동한다. (그림 참조)


5.4 3차원 데이터의 합성곱 연산

일반적으로 영상은 [가로x세로x채널]의 3차원 데이터이다. 아래 그림과 같이 채널쪽으로 특징 맵이 여러 개 있다면 입력 데이터와 필터의 합성곱 연산을 채널마다 수행하고, 그 결과를 더해서 하나의 출력은 얻는다.


5.5 풀링 계층

풀링은 가로, 세로 방향의 공간을 줄이는 연산이다. 아래 그림과 같이 2x2영역을 원소 하나로 집약하여 공간 크기를 줄인다. 일반적으로 풀링의 윈도우 크기와 스트라이드는 같은 값으로 설정한다.


[Scrap] Zero to Hero: Guide to Object Detection using Deep Learning: Faster R-CNN,YOLO,SSD

Zero to Hero: Guide to Object Detection using Deep Learning: Faster R-CNN,YOLO,SSD https://cv-tricks.com/object-detection/faster-r-cnn-yo...